Spondylolisthesis has traditionally been divided into categories based on the underlying pathology causing the slip (ie: the Wiltse classification). These categories include: congenital, isthmic, degenerative, traumatic, pathologic, and post-surgical (aka: iatrogenic).
Regardless of the category, the end result is the same: one vertebrae slips forward relative to the one below it. Let’s talk about each category in more detail…
Congenital spondylolisthesis occurs in children. It is usually caused by malformation of the superior articulating facet of the first sacral vertebrae (S1). The facet is a portion of bone that forms a joint with the vertebrae above or below it. Therefore, in congenital spondylolisthesis the malformed S1 facet joint is unable to form a stable joint with the lowest lumbar vertebrae (L5). The end result is that the L5 vertebrae is able to slip forward relative to the sacrum.
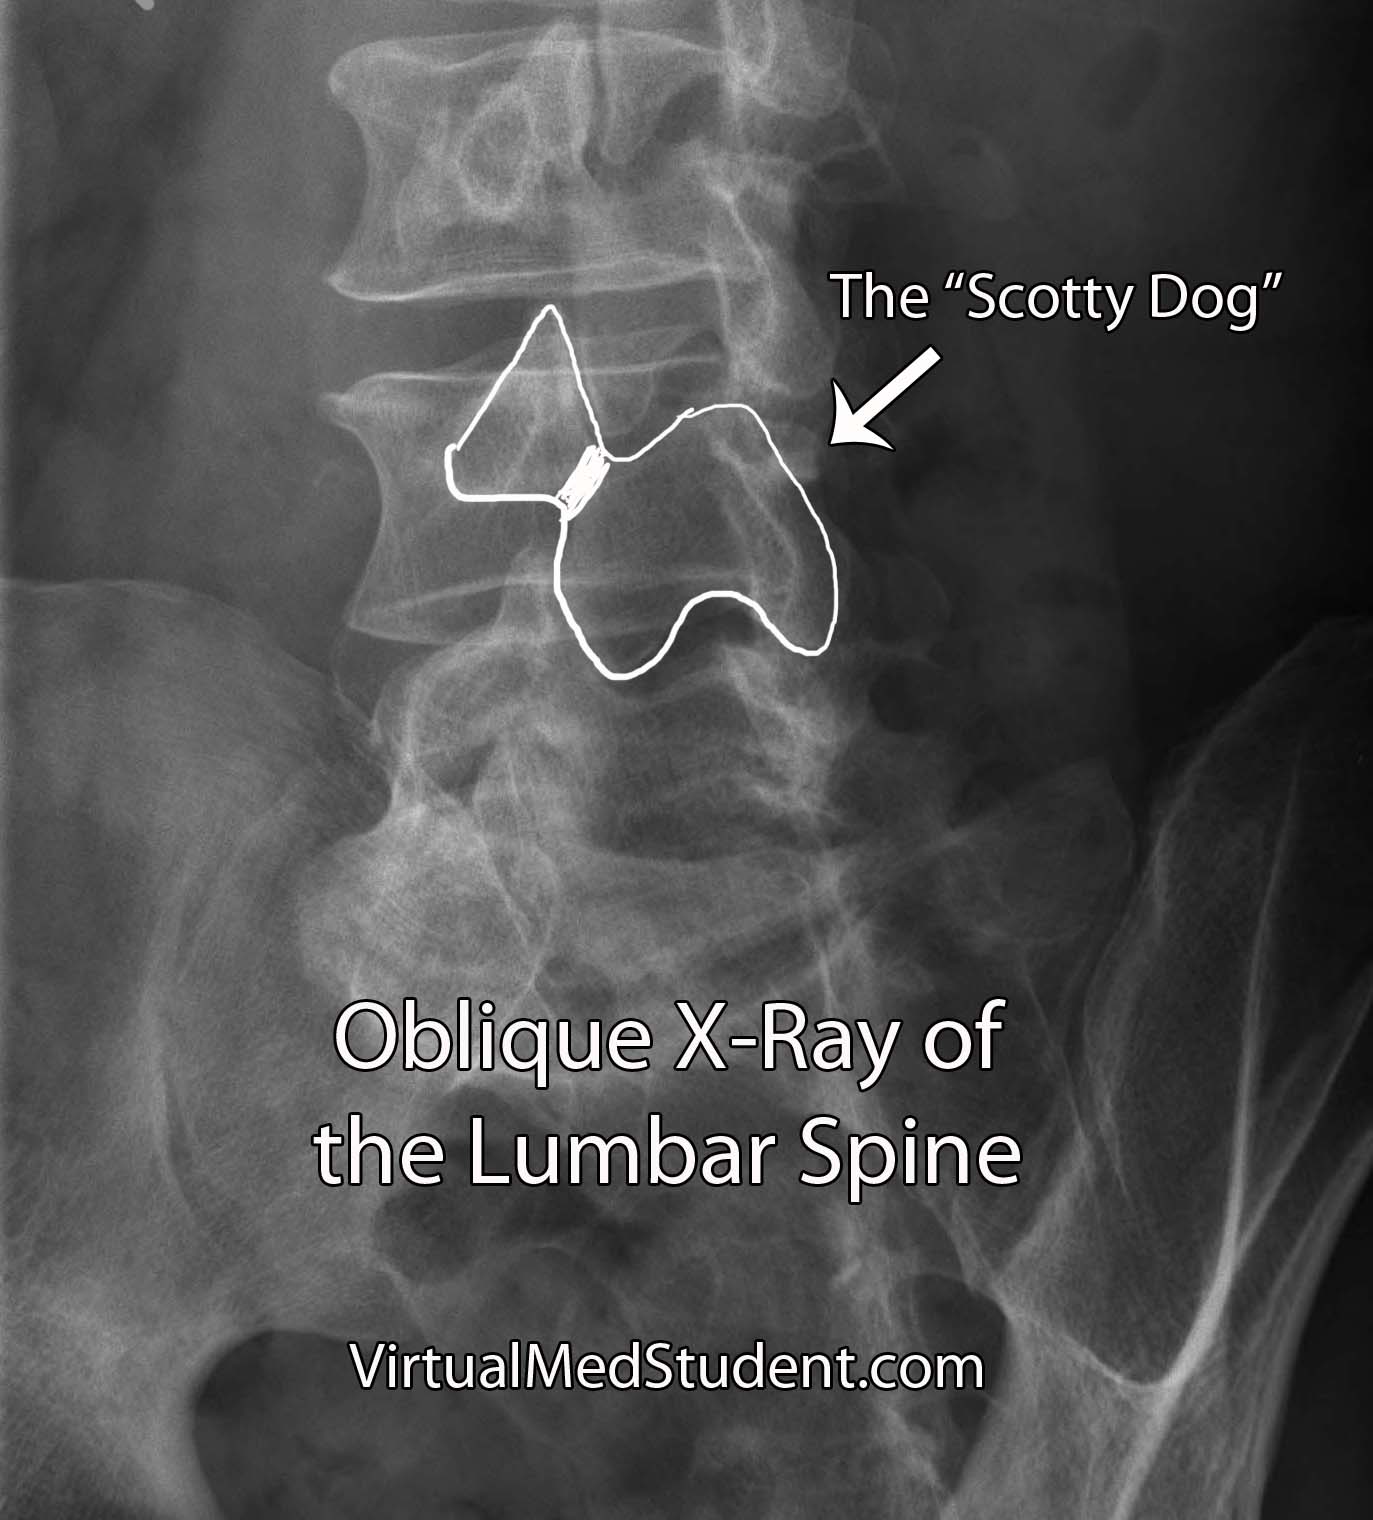
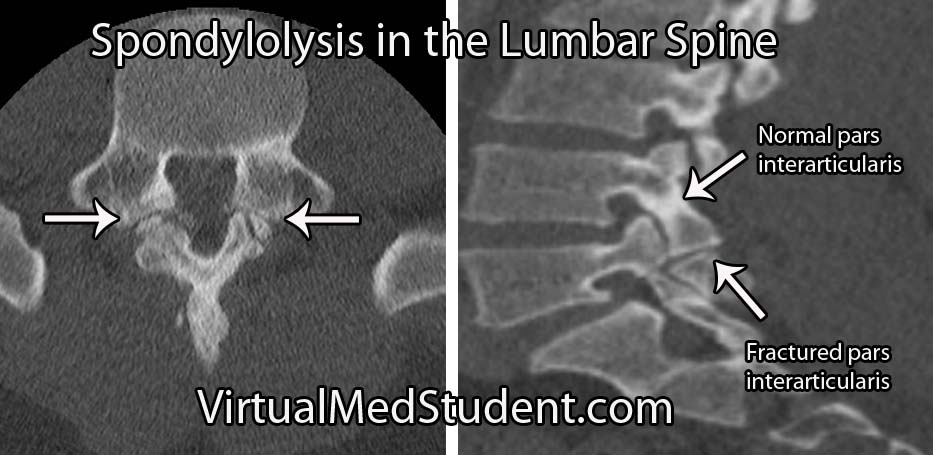
Isthmic spondylolisthesis occurs when there is a break in the bone that connects the facet of one vertebrae to the facet of the vertebrae immediately above (or below) it. This connecting bone is known as the pars interarticularis. The defect in the pars interarticularis is known formally as spondylolysis (see image below). Spondylolysis does not necessarily cause spondylolisthesis, but when it does it is classified as "isthmic". This type of spondylolisthesis is more common in those of Inuit heritage, as well as in athletes who have had repetitive hyperextension of the lumbar spine (ie: gymnastics, tennis, football, etc).
Traumatic spondylolisthesis is exactly what it sounds like. Injury to the facet joints, pars interarticularis, or ligaments of the spine can allow one vertebrae to slip forward/dislocate relative to the one above and/or below it.
Post surgical (also known as iatrogenic) spondylolisthesis occurs after surgery. It most frequently develops after a laminectomy is performed. If too much bone is removed during the laminectomy it may cause instability and allow a slip to occur.
The last category, degenerative spondylolisthesis, affects people over the age of forty. It is unclear exactly what causes this type of spondylolisthesis, but it is believed to be secondary to a combination of arthritic changes in the facet joints, degenerative disc disease, and bony remodeling of the pars interarticularis. Degenerative spondylolisthesis, unlike isthmic or congenital, usually results in the fourth lumbar vertebrae (L4) slipping over the fifth lumbar vertebrae (L5).
How Do Patient’s with Spondylolisthesis Present?
Spondylolisthesis typically presents with a combination of low back pain with or without radiculopathy (ie: discomfort down the legs). The radiculopathic symptoms are due to narrowing of the intervertebral foramen and pinching of the nerves as they exit the spinal column.
Neurological symptoms such as weakness, bowel or bladder problems, or sexual dysfunction are uncommon, but can also occur. These symptoms become more common as the severity of the slip increases.
Many patient’s with spondylolisthesis also have significant hamstring tightness (ie: unable to touch their toes). Additionally, many patients will walk or stand with their torso or knees in a flexed position.
Diagnosis and Severity of Slip
Diagnosis of spondylolisthesis is based on x-rays, CT scans, and MRI imaging. X-rays and CT scans are best at delineating the bony anatomy. MRIs are frequently ordered to assess the amount of nerve compression (especially in patients with signs of neurologic dysfunction).
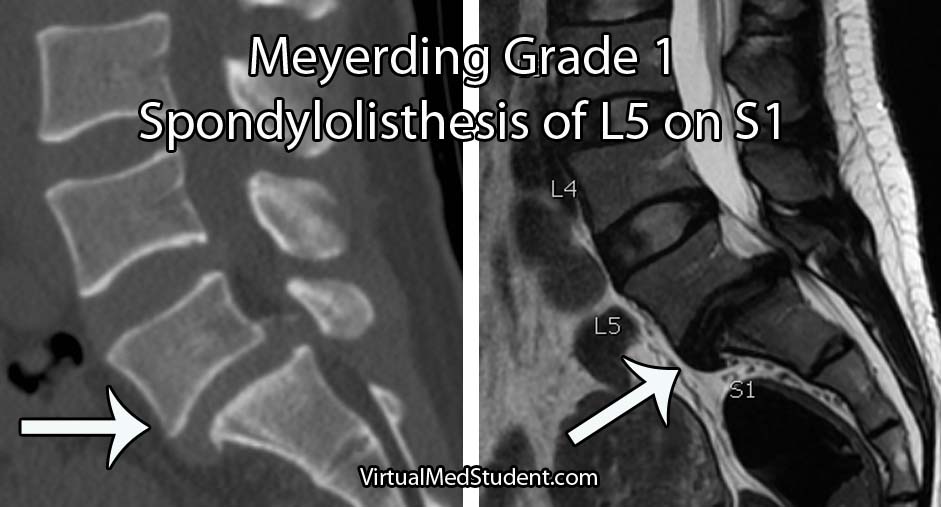
The severity of the slip is based on the Meyerding classification system. Type one slips occur when less than 25% of the diameter of the vertebral body slips forward relative to the one below it. Type two slips are between 26% and 50%. Type three slips are between 51% and 75% and type four slips are between 76% and 100%. If a slip is more than 100% it is referred to as a grade five slip or spondyloptosis.
Fix Me Doc!
Initial treatment for low grade slips presenting with back pain and mild radiculopathy is usually conservative. Physical therapy, joint injections, ibuprofen (or other non steroidal anti-inflammatory medications), and bracing can be used for several months. Physical therapy should focus on lumbar flexion exercises with avoidance of lumbar extension. If symptoms continue or worsen then surgery is indicated (talk to your local spine surgeon).
Patient’s who fail conservative treatment, have high grade slips (ie: greater than 50%), or have weakness, bowel/bladder issues, or sexual dysfunction should be offered surgery. The primary goal of surgery is to prevent further slippage by fusing the vertebrae together; realigning the spine is a secondary goal, but is not absolutely necessary. In fact, attempts to realign high grade slips have been shown to increase the risk of neurological injury.
The type of surgery offered to correct spondylolisthesis may be from the front (ie: anterior), from the back (ie: posterior), or a combination of both. As of now, there is no “right” surgical approach.
The Play by Play…
Spondylolisthesis is a fancy term that describes one vertebrae slipping forward relative to the one below. There are six categories based on the underlying pathology causing the slip. These categories are congenital, isthmic, degenerative, traumatic, pathologic, and post surgical/iatrogenic. Symptoms are typically low back pain with a component of radiculopathy. Weakness, bowel/bladder or sexual dysfunction is actually uncommon unless high grade slips are present. The Meyerding system is used to determine the severity of the slip. Treatment for low grade slips is usually conservative, but surgery may be necessary for high grade slips, patients that fail conservative management, or those with hard signs of neurological dysfunction.
Additional Pathology You Might Fancy…
- Os odontoideum
- Dislocated cervical facet
- Hangman’s fractures
- Odontoid fractures
- Thoracolumbar burst fractures
- Spondylolysis
References and Resources
- Sutton JH, Guin PD, Theiss SM. Acute Lumbar Spondylolysis in Intercollegiate Athletes. J Spinal Disord Tech. 2011 Oct 13.
- Leone A, Cianfoni A, Cerase A, et al. Lumbar spondylolysis: a review. Skeletal Radiol. 2011 Jun;40(6):683-700.
- Standaert CJ, Herring SA, Halpern B, et al. Spondylolysis. Phys Med Rehabil Clin N Am. 2000 Nov;11(4):785-803.
- McTimoney CA, Micheli LJ. Current evaluation and management of spondylolysis and spondylolisthesis. Curr Sports Med Rep. 2003 Feb;2(1):41-6.
- Jones TR, Rao RD. Adult isthmic spondylolisthesis. J Am Acad Orthop Surg. 2009 Oct;17(10):609-17.
- Weinstein JN, Lurie JD, Tosteson TD, et al. Surgical versus nonsurgical treatment for lumbar degenerative spondylolisthesis. N Engl J Med. 2007 May 31;356(22):2257-70.
- Swan J, Hurwitz E, Malek F, et al. Surgical treatment for unstable low-grade isthmic spondylolisthesis in adults: a prospective controlled study of posterior instrumented fusion compared with combined anterior-posterior fusion. Spine J. 2006 Nov-Dec;6(6):606-14.